Tuesday, April 30, 2013

Saying Goodbye to a Bolt

Everyone has memories that seem to last forever. Your first kiss, your first crush, your first car, your first date, etc... Well, this was my first mad hording of a bolt of fabric. 


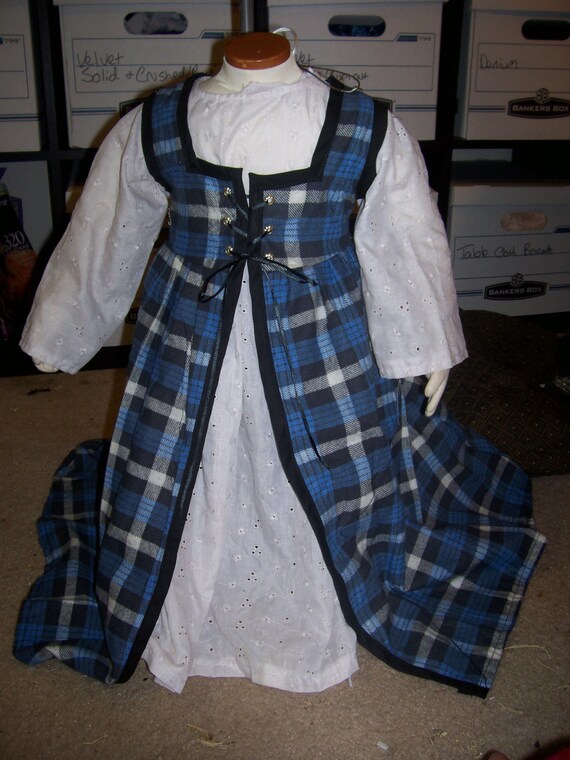
I remember very clearly finding this bolt of blue/black/white plaid flannel on the $1 rack at Walmart. I fell in love with the fabric and bought the entire 10 yard bolt. Then I went back a week later, found and bought another 10 yard bolt.  

This was the first fabric I made kilts from. And the first fabric I made toddler's dresses from. 


This past summer it was nick-named "TARDIS Plaid" and a pre-teen Whovien girl wore it to the local Renaissance fair.


This fabric has been with me almost since the beginning of my passion. While it is good that I am completing my mission to deplete my monstrous stash, it's kind of a bitter sweet feeling this time. 


There are still a few yards left, so if you'd like to have your piece of this TARDIS Plaid before it's gone contact me here in my Etsy Shop or here through Facebook. 

Good bye old friend.


Thursday, March 28, 2013

M'lady is a Harsh Task Mistress

There are always other things to do. For me personally, I have school, a full time (plus) job to pay the bills, my passion driven costumes, then family and social obligations. Then there are the little things one doesn't think as obligations such as eating, sleeping, grooming and driving to and fro that also eat at the hours of the day. So how does one maintain some sort of success with a home based business, and balance all of those other daily life things? I had to ask myself this very question as I took on going to college to get my degree. Here are some things I came up with:


  1. Keep a calendar
  2. Wear different "hats" for different jobs
  3. Keep track of time
  4. Schedule time for yourself

This all seems simple enough right? Obvious even? I thought so too when I first realized that I was loosing control, over stressing myself, and loosing possible customers. So let's break it down a bit more. 

Keep a Calendar 

I started out old school with this and went out and bought one of those nifty school year calendars and sat down with some different colored pens. In the first month I wrote out my class names each in a different color, along with "work" and "social" each in their own colors. I then set out and wrote in my schedule. This was very handy. Every class was clearly labeled at the proper hour on the proper day in the proper color, along with my work schedule. The book came with me to classes and to work and I would mark down (in the proper color) any assignments that were due on the due date. It looked lovely, and was very orderly, but I soon realized that I never looked at the book and was instead always looking at my google calender. So I took it there and it ended up looking something like this:


Now that I had all of those obligations listed out, I could fill in time to work on costumes, and I do schedule this out along with admin time for things like posting on Etsy, Facebook updates, Twitter feeds, and of course Blog entries. Seeing everything written out this way helps me to keep from overlapping things. The weekly view makes this even easier to see. 


So I can be sure that I don't schedule an appointment with my doctor to when I have to be at work, which is 1.5 hours from his office; or I don't schedule a fitting when I'm supposed to be in class.

But as the costumes are done mostly in my home, and there is home work both for school and the job sometimes, and I do need some down time, how does one stay focused on the task at hand?

Wear Different "Hats" for Different Jobs

What does this mean? Well, pretty much what it says. I'm the type of person that does better when I'm in a very structured environment. The problem with this is that with being self employed, I have to set the structure and hold myself accountable. I was having trouble separating my "me time"  from my "sewing wench time" at home, but I noticed that when I was at the job, I didn't have a problem focusing on my work there and nothing else. The solution was to make a uniform for the sewing wench.

It doesn't have to be anything fancy. I was in need of something to keep my scissors, chalk pencles, fusible-web, seam ripper, measuring tape, and other tools close at hand as I move about my work space and came across this apron.

This lovely apron may not look like it has any pockets, but it actually has three very large ones. The artist fussy cut the fabric to make match perfectly and then hand stitched the entire thing. If you would like more information on her, please contact me and I can put you in touch. She's not in social media yet.

Notice I'm rocking my pjs under it? It doesn't mater what I wear under the apron, but when the apron is on, I"m in "sewing wench mode". When I want to take a break, I take the apron off.  For school work I have a pair of jeans that I wear, and for the off time that I have job home work I have a hair tie. These are all very little things, but they help me remember "hey, I have a job to do" and when it's time to move to another task, I take that uniform off. 

And switching time brings me to the next point. 

Keep Track of Time

Sometimes this is the hardest thing for the self employed. Not only keeping track of the time you spend working, but paying yourself for that time. No one likes to work for free, but how do you know what to pay yourself if you don't keep track of how many hours you work?

Again, I started this old school style with pen and a weekly calender. This calendar has a magnet on the back so I stuck it to my door. When I started "wench work" I punched in buy writing down the time under the right day and punched out for lunch and other breaks. I also made notes of what I worked on and tallied the hours at the end of the week. (This also helped me price items as I knew my time put into a project and my hourly rate but we'll talk about that in another post.)


 But being the tech loving person I am, I soon looked for a digital tracker.

HoursTracker for iPhone is what I settled on. There is both a free version and a paid version, and the free one is enough for me at the moment. The spiffy thing about this app is that you can set your hourly rate, and it will figure how much money you are due at the end of a period. You can also set different rates for different jobs, put in your entries manually or clock in and out (as I do), set over time rate daily or weekly, round up features and it will even let you email the reports to yourself or anyone else. This really is a handy little app and it can sit right beside me while I work, so I look over, punch out and I'm off.  And off time is the final point I will talk about.

Schedule Time for Yourself


This is probably one of the most important parts in this blog post. At first I figured "oh, I'm doing something I love to do, who needs time off?" but I soon realized all work and no play....well doesn't make one very happy and can lead to dreading something that you normally love. So I started scheduling "me" time. Now this isn't the time you spend at Sunday brunch with Mom, or Billy's hockey practice, or even family movie night, this is time just for you to do whatever you like to do. Now for me this is often the time I take to make myself a new corset or outfit of some sort, but it can also be video game time or an unplanned girl's night out (by unplanned I mean not a routine thing, not something that you do every month, that falls under "social obligation" even if it is fun). Again, it doesn't have to be a big huge event, and you can be a bit flexible with it, but make sure you schedule at least one hour a day (average over a week) for you. And sleep doesn't count either!

These things have helped me from going completely mental while trying to balance a heavy load. We all have obligations of many kinds and sometimes we just have to sit and make it work. One of my favorite quotes is:

"He who fails to plan is planning to fail" ~ Winston Churchill

I've kept that to heart, and it really is true. A little time invested in a plan will save so many headaches. 

Sunday, March 24, 2013

Penny Pinching Peasant

I found this nifty peasant dress tutorial on Pinterest and decided to try it out myself, with a few modifications.


I don't like putting elastic in my Ren items for these reasons:

  1. It can be very uncomfortable for long wear
  2. It limits sizing a bit once it's put in
  3. It's very much not a period thing (for those who are concerned with that)
For these reasons (and the simple fact that elastic isn't always the easiest thing to work with) I chose to use draw strings for this project. This will also allow the wearer to tighten or loosen the neck line to the desired fall point. 

I also did this to the sleeves to add in a flounce and make the sleeves able to be tightened to a higher point on the arm. 

Now this tutorial did a really nice job explaining the construction, so I'm going to mainly talk about my modifiers.

My dummy is a 6 month old size, so I decided to make my peasant dress sized for an 18 month old. For this I cut two rectangles 14" x 16.5" for the body and two rectangles 14.5" x 15".  Once the rectangles are cut, the tutorial says to cut a "j" shape on the top corners of each rectangle to make room for the arms. You could use a french curve if you have one, but I simply took one of my favorite patterns and used the curve in the arm hole from that. I also had stacked all four pieces on top of each other to make sure that I had the curve the same in all of them. After I cut that curve, I saved the cut off pieces and traced it onto heavy "Kraft" Paper forming a template that I can use later.

After cutting all of my pieces out, I surged all of the edges. 


 This is the sleeve, and this is the first spot where I drifted from the tutorial. Now she put in elastic about an inch above the hem of the sleeve, I like draw strings. There are two ways to put this in (and I'm sure even more than that!). You can wait until the garment is finished, but I like to do it while it is flat, and that's the way I'm going to show you now.

First, we press up the hem. 


 After I have pressed the hem in (starching the bee-jee-beeies out of it!) I measured up to where I wanted the draw string to go.


I decided on 3". So fold up the fabric, from the hem, 3" and press. 

To form the casing, I measured half an inch from the fold and pressed that bit down. 


Now unfold the hem, and and press flat so that you have a little flap of folded fabric about 3" above the hem. 


 This is when I put in a button hole. I found the center, and sewed the button hole right on that little folded flap, on the right side of the sleeve.  Then sew the hem and the casing down.


Now sew those arms together. I like to sew these in a circle, sleeve to body-> body to sleeve-> sleeve to body, and then join the circle to make sure that I'm sewing the pieces in the right spot. 


Now I string through the cord. Since the width of the sleeve is 14.5", I cut the cord 17" long. This is long enough to thread through and leave a bit. 

Rip out the button hole and fish out the cord.


Pull the cord through the button hole. Match the cord to the edges of the casing on each side leaving the extra 2.5" inside of the casing. I usually leave about 1/4" on each end just to make sure I catch the cord when sewing the seams.


With right sides together, sew from the hem of the sleeve down to the end of the dress making sure to catch the cord in the seem. This will give you a drawstring at the wrists that will never be pulled out!


 To finish the neckline, I took a length of  1" bias strips and sewed it in the top. I started by folding the end in on the bias strip


and then matching the long ends together.


Matching raw ends together I sewed the bias to the neckline. I did this first with the bias on the outside of the dress. This makes the tie end up on the inside. The second time I did it with the bias starting on the inside so the tie ended up on the outside. Either way works, but I prefer it on the inside myself.


Now, when you have worked your way back around to the beginning of the bias, cut the strip just long enough to meet the folded edge of the starting point, plus 1/4"-1/2" to fold over the end and continue.

Next step is to fold the bias over to the other side (covering the seem), press, and stitch the casing down.


This should leave a tube at the neckline, and because of the folds, we don't have to make a buttonhole opening. Just thread the cord through and hem up the bottom and you're done.


It was at this point that I realized I had used the measurements for the shirt sized 18 months not the dress. But I put a doubled 1.5" hem in and, as you can see, the length is still good for this to be a dress at this age.

These are not listed in the Etsy shop yet, but you can check out the shop here and message me that you are interested in one of these.  Or find us on Facebook. 

Friday, February 22, 2013

Some Dwindling, Some Gathering

As this blog was created to help me clear my stash I thought I should give an update.

Here it is two months into the year, or 53 days into this project, and I don't seem to notice a difference. In fact, if anything I've suffered a setback.

The dog sweaters that I started with have cleared out about 2 yards of scrap fabrics, and the bed jackets or shawls another 6 yards, and the capes a little more than half a yard. That makes for less than 10 yards used up in the first 53 days.

I did have two orders for this adorable overdress which ate up another 3 yards. However I also had to venture to the fabric store to buy fabric for an under dress. Yes, I actually had to purchase fabric because I did not have any cotton in that color. Unfortunately for my poor sewing nook, they were having a clearance sale and I went home with an additional 45 yards.

So 53 days in I'm at +32 yards, but I'm also full of ideas and will soon have new items in the shop, and more tutorials here.

If you'd like to help me dwindle down my stash, I have many custom listings in my shop here.


Saturday, February 16, 2013

Why for art thou Capelet? And a French Seam at that!

One day while wasting way too much time on Pinterest, I came across this blog of a lady and her attempt to make an elf cape for her little one. This gave me an idea. 

What could be easier than making a circle cape?

The first thing I did was measure my dummy. This one is sized at 6months. 

I decided that I wanted the cape to be 9 inches long, so it would hit about the diaper. 

The next step was to measure out a length of fabric 18 inches long. This fabric is 45 inches wide.

I then folded the fabric in half so that it would measure 9 inches wide and began my circle by pining the tape measure in the corner and following the 9 inch mark around with my marker. This can also be done with a length of string.

Now we open it up and we have a half circle


I then folded the fabric again to form a neck opening. Because this will be open in the front, a 3 inch circle is enough, and a 3 inch bit of fabric in the front seemed to look good to me, so I folded  the fabric down 6 inches and then from the fold completed a 3 inch circle as we did before. 


Open and we can see the capelet coming to shape.


Now, with the width of the fabric being 45 inches, I had a choice to use the extra bit to make a hood, or I could make another capelet. I chose the second option. This did however end with two half circles rather than one whole one. As this is a bit of flannel, and would possibly be seen on both sides, I wanted as neat a back seam as possible, so I chose to do a French seam. 

Start by sewing the back seam with right sides together.


 I then trimmed the seam down to about an 1/8 inch.


 Folding wrong sides together, I trap the seam and sew another 1/4 seam.


 Unfold and you have this.

 So far, so good. Now press the seam down, make it as flat as possible.

 And top-stitch as closely to the edge as possible. You're sewing down this little flap that you have created.


 This will create an almost invisible seam that will look as neat on the back as it does on the front. 

 Now I finished off with a bit of black bias, sewn all around the cape. Use your favorite method for this.


 Now we just need a way to close the front. I chose buttons and a loop. I think that it adds a bit of flair to it. You could use a cloak clasp, or button and button hole, or snaps or hooks. 

To do this, I first folded a 2 1/2 inch length of ribbon in half and sewed it to one side of the capelet.


I then added a button right on top of the stitching, and one on the other side an equal distance apart. 


And it's done. 


Again, this dummy is sized at 6 months, but this little capelet could add a touch of whimsy to costumes up to a 2T. In fact, the chemise on this dummy is a 2T, so you can see when it would drop on a child of that size. 


If you would like to buy this item, you may purchase it here.

Or check out my shop for other goodies.  

Wednesday, January 30, 2013

Wrapping Up With a Bit O' Irish- Simplicity 1735

It's a chilly, rainy day here, and as I had nothing better to do (besides cleaning the house, and who really wants to do that?) I've nipped away at my stash just a bit more. The form this takes is Simplicity pattern number 1735, view A, the cape.


And this is the fabric and trim.


The white fleece with shamrocks I found at Walmart last summer for $1.00 a yard. So I bought all 8 yards that they had of it. The greener busier Paddy's Day themed fleece was bought at Joann's when the red tag section was marked 50% off, which made this fabric $3.00 a yard. Again, I bought all that they had, this time only 2 3/4 yards. Finally the fringe was the most expensive part at $4.99 a yard (need 5 yards).

First step is always the cutting. This job isn't as tedious as some other patterns as it only has one piece to it! 
I love this little pin dispenser! I found it at Hancock Fabrics, but I have seen them at JoAnn's as well. 

I still like to line up the fabric, folded edges together, and pin through all of the layers. Cutting is a bit difficult all at once, though, so I typically will cut the top layer first, and then the bottom when working with fleece. With this pattern, I will also note, that it is best to line up the "front edge" of the pattern, with the folded edges of the fabric, rather than the "center seam" edge. After making a few of these, I've just found that it uses slightly less fabric (1 1/2 yard vs the 1 5/8 the pattern calls for). It also just lays nicer with out having to refold the fabric. 

Once it's cut, line up and sew the darts. 

I sewed all of the white seams first, then switched thread and sewed the darker fabric.


I did consider removing the darts and just cutting the neck round. While this would save a sewing step, I like the way that the darts make the cape form to the shoulders. 

Next is the center back seam.


Now this is where I differ from the pattern. The pattern tells you to leave an opening in the center seam of the lining fabric for turning. Later, after turning, you'd whip stitch the opening closed. This is a fine technique if you only have one side to your cape, but I like to make them reversible, so I sew the whole seam on both pieces. 

Here's where the trim comes in. 


Sew the trim all the way around one side of the cape. Since this is white trim, I sewed it to the white fabric first. Start at the bottom edge of the center seam, and leave a tail of about an inch of the fringe (or piping or lace). This is to allow a flat finish. If you are using piping, cut out about an inch of the pipping filler. Sew the fringe around, and when you come to the last inch of meeting the start, fold the starting tail down towards the bottom (towards the inside of the machine) and then fold the ending inch down over the first in the same direction. Do this as an eased turn, not a 90* angle. Sew over the folded in pieces, and you should be back to where you started. 


Now, with right  sides together, sew the top fabric to the inside fabric. In this case, the green to the white. As I mentioned earlier, I sewed all of the white bits together first (this includes the fringe) and then switched threads and sewed all of the green bits. At this point, I changed the bobbin thread to the white, and left the needle thread with green. Test your machine settings before continuing this way. Because my tension was not set properly, I did not get the full white on bottom green on top that I had intended. What I ended up with was green on top and mostly white with freckles of green peaking out. I actually liked this and left things how it was, since the white fabric had green shamrocks, it worked. 

Anyway, sew the two capes together, right sides matching, all around the edge leaving a hole for turning. 


Then turn. Which puts us here. 

you can just see the folded over tails that I mention.


Now to close up that hole. You could simply whip stitch it closed, but I like to top stitch all the way round. This worked wonderfully and smoothly for the fringe, but was a bit difficult when I did the pattern with fur pipping, even with a zipper foot. Just something to consider when deciding to do the pattern the way the pattern states, or the way I have done it here. 

Once you've zipped around, you're done! I will say that one thing I like about the top stitching, is that it gives you a chance to fix issues where you may have missed the fringe edge or not sewn down at much as you wanted to. 

And the finished product. 


This one will stay in my personal collection. If, however, you would like one of your own, and don't wish to make it yourself, you can find my Etsy Shop here.

As of January 30th, 2013 I do not have one ready made in the shop, but I will update as soon as I do. In the mean time, please message me and I'll be happy to whip one up of your very own!